

• Solutions for Every Building, Every Stakeholder

    URBI is the first Building OS powered by HERO AI. Whether you manage properties, own them, or operate them day to day, URBI transforms complex, disconnected workflows into a single, intelligent platform that drives efficiency and builds stronger communities.

    Role Benefits

    • For Property ManagersStreamline operations and enhance tenant satisfaction with centralized management tools.
    • For Building OperatorsSimplify daily tasks and maintenance with intelligent automation and workflow management.
    • For OwnersMaximize ROI and property value with comprehensive oversight and analytics.
    • For Finance TeamsClose faster with double entry books, trust accounting, and reconciliation that runs nightly.
    • For BusinessesConnect with building communities and expand your service offerings.

    Building Benefits

    • Residential BuildingsSimplify living with one app for bookings, packages, payments, and community updates.
    • Commercial BuildingsStreamline operations, vendors, and compliance while giving tenants a frictionless experience.
    • Education BuildingsManage facilities, visitors, and compliance for safer, smarter, more connected campuses.
    • Senior LivingAnswer families around the clock, publish life enrichment once, and see every community on one screen.
  • One Platform. Smarter Buildings.

    URBI centralizes daily operations and adds AI intelligence to transform complexity into clarity.

    Products

    • URBI KoreThe central hub where managers, owners, and staff run building operations in one place.
    • URBI KonnectA marketplace that connects buildings with trusted vendors, services, and community events.
    • URBI AccountingAI consolidation, invoices and receipts processed by AI, books pre reconciled before month end. In Beta.
    • URBI AIOne intelligence across URBI. HERO answers your team's questions, Arthur answers your community's calls, texts, and emails 24/7.

    Features

    • Operations & Workflow
    • Amenities & Booking
    • Events & Ticketing
    • Communication & Community
    • Payments & Transactions
    • Data & Compliance
    • HERO AI Intelligence
    • IoT & Hardware Integration
    • Community Experience
    • Accounting (In Beta)
    View All
  • Customers
    • All ResourcesGuides, support, and customer stories in one place
    • Help CenterGuides and answers for every part of URBI
    • BlogWhy URBI works the way it does
    • ReleasesEvery update we ship, in plain language
    • System StatusHow every part of URBI is running right now
    • About UsLearn about our story and mission
    • MilestonesHow URBI got here and where it is going
    • CareersWe're HiringJoin our growing team
    • FAQStraight answers about URBI, HERO and Arthur
    • ContactGet in touch with us

Schedule a Demo

  1. Help Center
  2. /Operations
  3. /Vendors and Work Orders
  4. /Enter or replace a vendor's bank details

Enter or replace a vendor's bank details

When a vendor has not added bank details, you can enter them yourself instead of waiting for the vendor to log in. You can also replace details already on file. Every entry and replacement is...

Last updated November 16, 2026

Operations
  • Approvals: decide expenses, board votes and RFPs in one place
  • Board Decisions: overview
  • Confirming packages, and what a refused package means
  • Document sharing
  • Finding the packages for one home
  • How to approve expenses and RFPs in Approvals
  • How to create a decision
  • How to create a time limited public link
  • How to generate the PDF report
  • How to run a vendor RFP through Board Decisions
  • How to share a file or folder
  • How to sort and arrange folders and files
  • How to upload with drag and drop
  • How to vote and finalize a decision
  • How to vote on board decisions in Approvals
  • Operations
  • Troubleshooting
  • Troubleshooting document sharing
  • When a scanned package needs a look
    • Add Assignees to a Service Ticket
    • Attach a Vendor to a Service Ticket
    • Convert a Service Ticket to a Task
    • Create a Service Ticket
    • Documents on a Service Ticket
    • How the Emergency Number Is Chosen
    • How to choose who receives resident service requests
    • How to Convert a Service Ticket into a Board Decision
    • How to download, rename and remove files on a task
    • How to filter service tickets and tasks
    • How to Reassign Work When Removing a Team Member
    • How to Set the Emergency Line
    • How to Sign Off on Vendor Work
    • Notes on a Ticket, and What the Resident Can See
    • Service Ticket Statuses Explained
    • Service Tickets, Troubleshooting
    • Service Tickets: Glossary
    • Service Tickets: Overview
    • Set Up Recurring Service Tickets
    • The History on a Ticket: What It Records
    • The Tabs on a Service Ticket, Explained
    • Troubleshooting
    • What Residents See When They Create a Ticket
    • What the Ticket Activity Tab Records for Vendors
    • What's New in Service Tickets
    • Who Can Do What on a Service Ticket
    • Add Assignees to a Task
    • Create a Task
    • Organize Tasks with Categories, Projects, and Labels
    • Set Up Recurring Tasks
    • Access Request Statuses Explained
    • Choosing Who Receives a Request for Access
    • How to Send a Request for Access
    • Mandatory vs Request: Which One to Send
    • Recording an Answer on Someone's Behalf
    • Requests for Access: Glossary
    • Requests for Access: Overview
    • Requests for Access: Troubleshooting
    • Reschedule Requests: How They Work
    • Sending a Reminder for a Request That Has Not Been Answered
    • What the Recipient Sees and How They Answer
    • Awarding the Work
    • Comparing Proposals
    • How to Invite Vendors to an RFP
    • Requests for Proposal: Glossary
    • Requests for Proposal: Overview
    • Requests for Proposal: Troubleshooting
    • RFP Statuses Explained
    • What a Vendor Sees and How They Submit a Proposal
    • Asset Impact: Overview
    • Asset Impact: Troubleshooting
    • Cancel Bookings or Block New Ones
    • Closure Statuses Explained
    • Confirming a Closure, and Why Scheduling Is Not Enough
    • How to Close an Amenity for Scheduled Work
    • Bank detail change alerts
    • Enter or replace a vendor's bank details
    • How to view and add a vendor's expenses
    • Requesting Completion, and Technician Notes
    • Vendor Billing Tab overview
    • Vendor Billing Tab, FAQ
    • View a vendor's full bank number
    • What a Contractor Sees on a Work Order
    All collections

    On this page

    • Who can use it
    • Canadian properties only
    • Where to find it
    • Enter bank details
    • Replace details already on file
    • What happens after you save

    When a vendor has not added bank details, you can enter them yourself instead of waiting for the vendor to log in. You can also replace details already on file. Every entry and replacement is recorded, and the vendor's contacts are told by email.

    The Payment details card is on the Billing tab in a vendor's profile. It shows whether bank details are on file, the bank name, the last 4 digits, who entered the details and when, and recent activity.

    Who can use it

    You can enter or replace bank details if you have the Manage payments permission for the property where you are working. Without that permission, you can still see whether details are on file, but the buttons to enter, replace or view are hidden.

    Canadian properties only

    Staff can enter Canadian bank accounts only, so Enter bank details and Replace appear only at properties in Canada. A property with no country set is treated as Canada.

    At a property in the United States, the card asks you to invite the vendor to add their US bank details in the vendor portal, and Send invite is the only button. At a property in any other country, the card asks you to invite the vendor to add their bank details in the vendor portal.

    Where to find it

    Open the vendor from the Vendors page, then select Billing. The Payment details card appears above the Billing summary. When nothing is on file, the card reads Missing and offers Enter bank details and Send invite.

    The Payment details card for a vendor with no bank details on file.
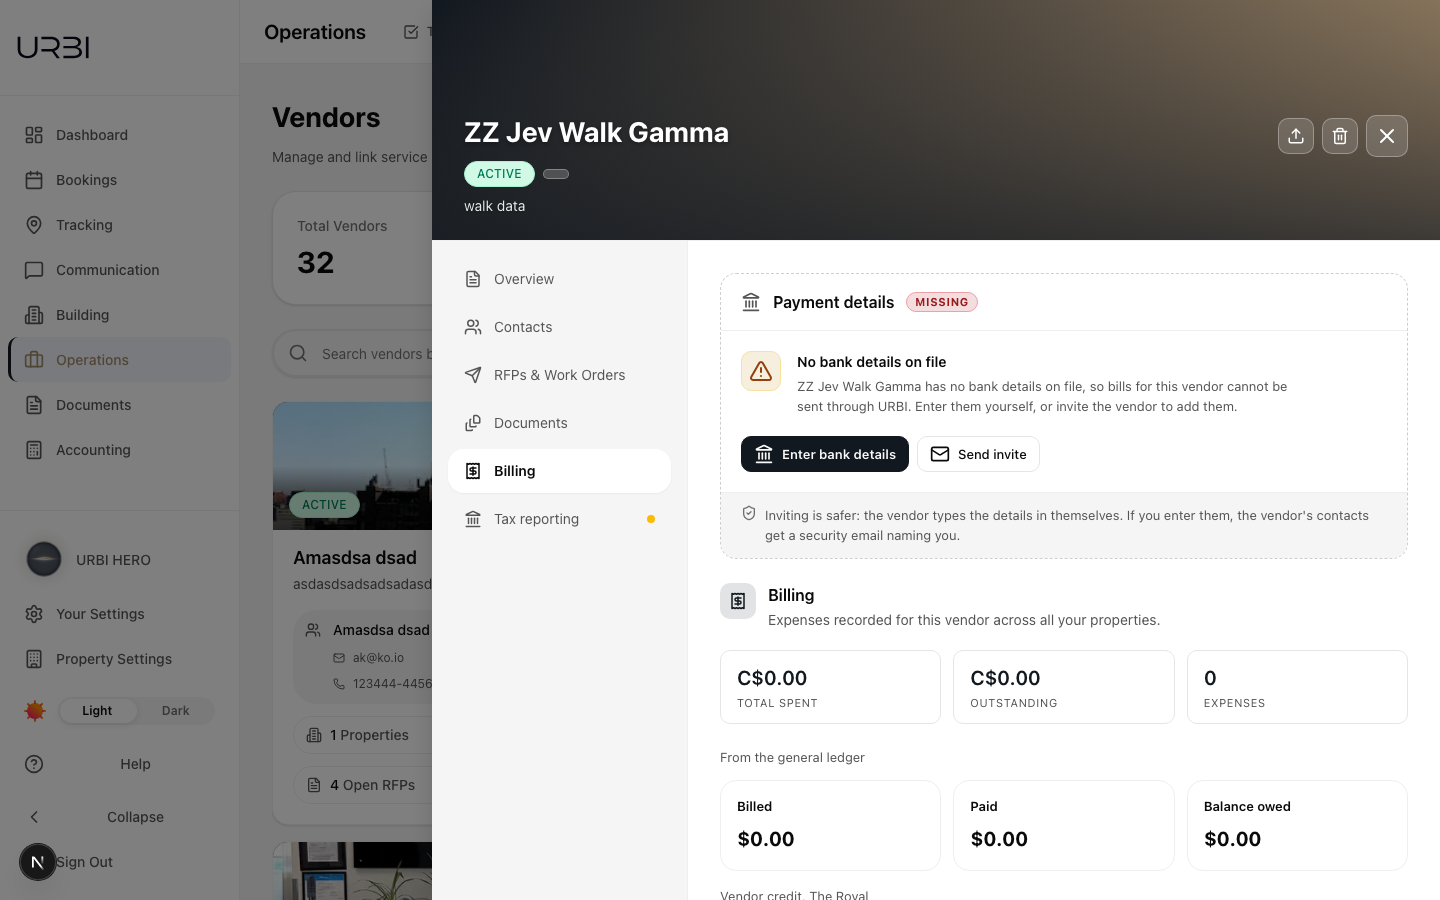
    The Payment details card marked Missing, with No bank details on file, the Enter bank details and Send invite buttons, and a note that inviting is safer

    Inviting is the safer choice: the vendor types the details in themselves. If you enter them, the vendor's contacts get a security email naming you.

    You can also start from a bill. When you select Pay this bill and the vendor has no bank details, the dialog shows Payout details missing above both payment options. Select Enter bank details to open the same form without leaving the bill, or Invite vendor to add payout details to send the vendor an invite.

    The Pay this bill dialog when the vendor has no payout details.
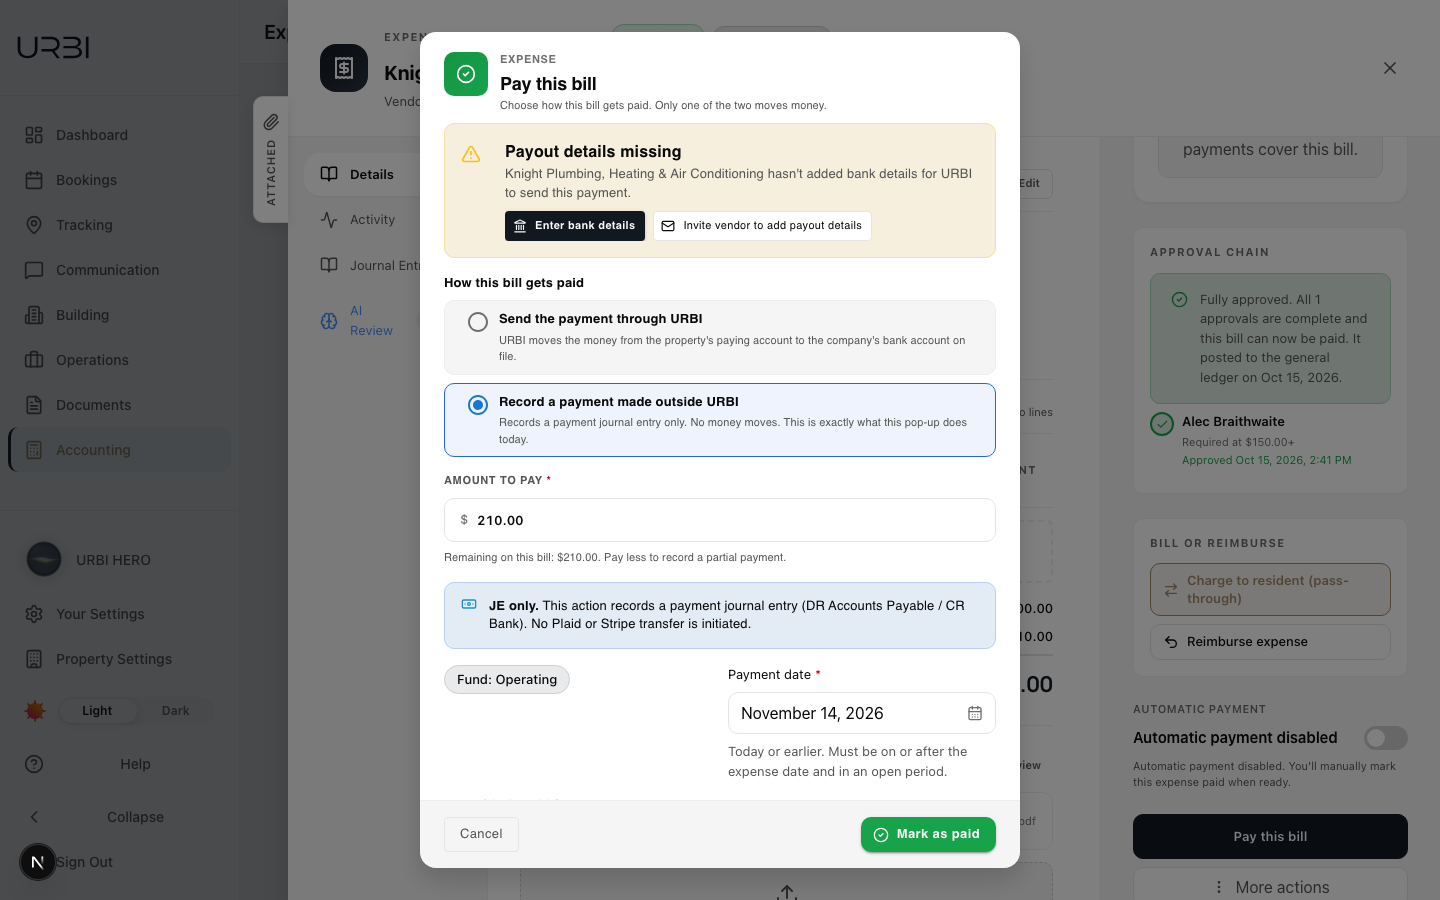
    The Pay this bill dialog with the Payout details missing message and the Enter bank details and Invite vendor to add payout details buttons

    Enter bank details appears in this message only at properties in Canada (see above). If the vendor's details on file are for a US account, the dialog says Bank details are for a US account instead: ask the vendor to update them in the vendor portal, or record a payment made outside URBI.

    Enter bank details

    1. Select Enter bank details.
    2. Enter the Name on the account exactly as the bank has it on file.
    3. Enter the Institution number (3 digits) and the Transit number (5 digits).
    4. Enter the Account number (4 to 12 digits, no spaces), then type it again under Confirm account number. Both boxes must match before you can save.
    5. If you have a void cheque or bank letter, attach it under Proof. Proof is optional. The file must be a PDF, JPG or PNG and no larger than 10 MB.
    6. Check the numbers carefully, then select Save bank details.

    The Enter bank details form.
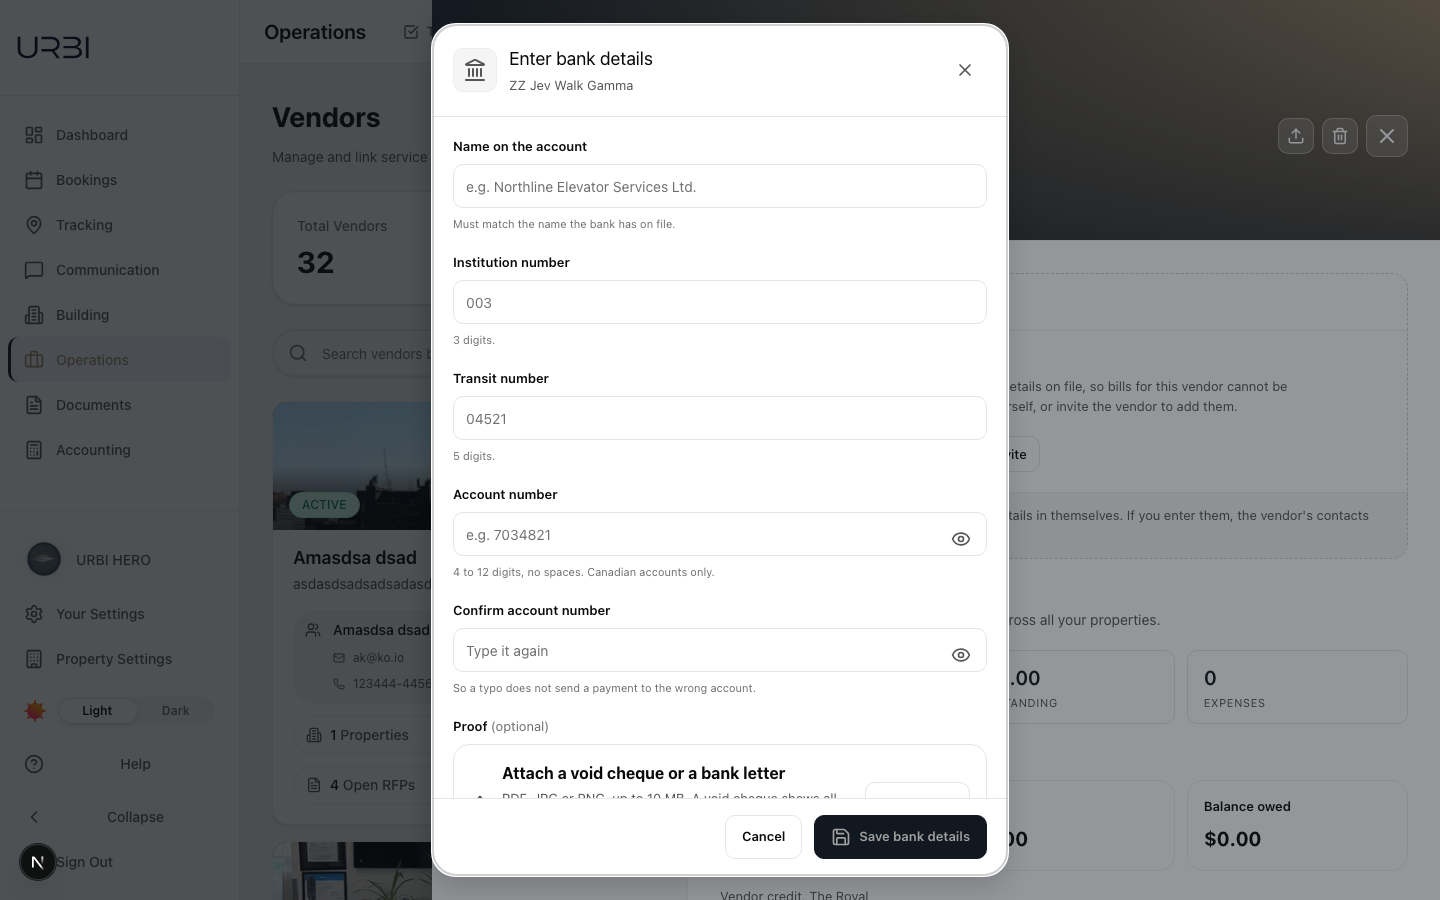
    The Enter bank details form with Name on the account, Institution number, Transit number, Account number, Confirm account number and the optional Proof attachment

    Saving can take a few seconds. If it takes longer, the form says Still saving. This page will update. Leave it open; the card updates on its own once the save lands, and you do not need to submit again.

    Replace details already on file

    1. On the Payment details card, select Replace.
    2. Read the confirmation. If the vendor entered the details themselves, it says so with the date and asks you to check with them first if you can. It also lists what happens when you save.
    3. Select Continue.

    The confirmation before you replace a vendor's own details.
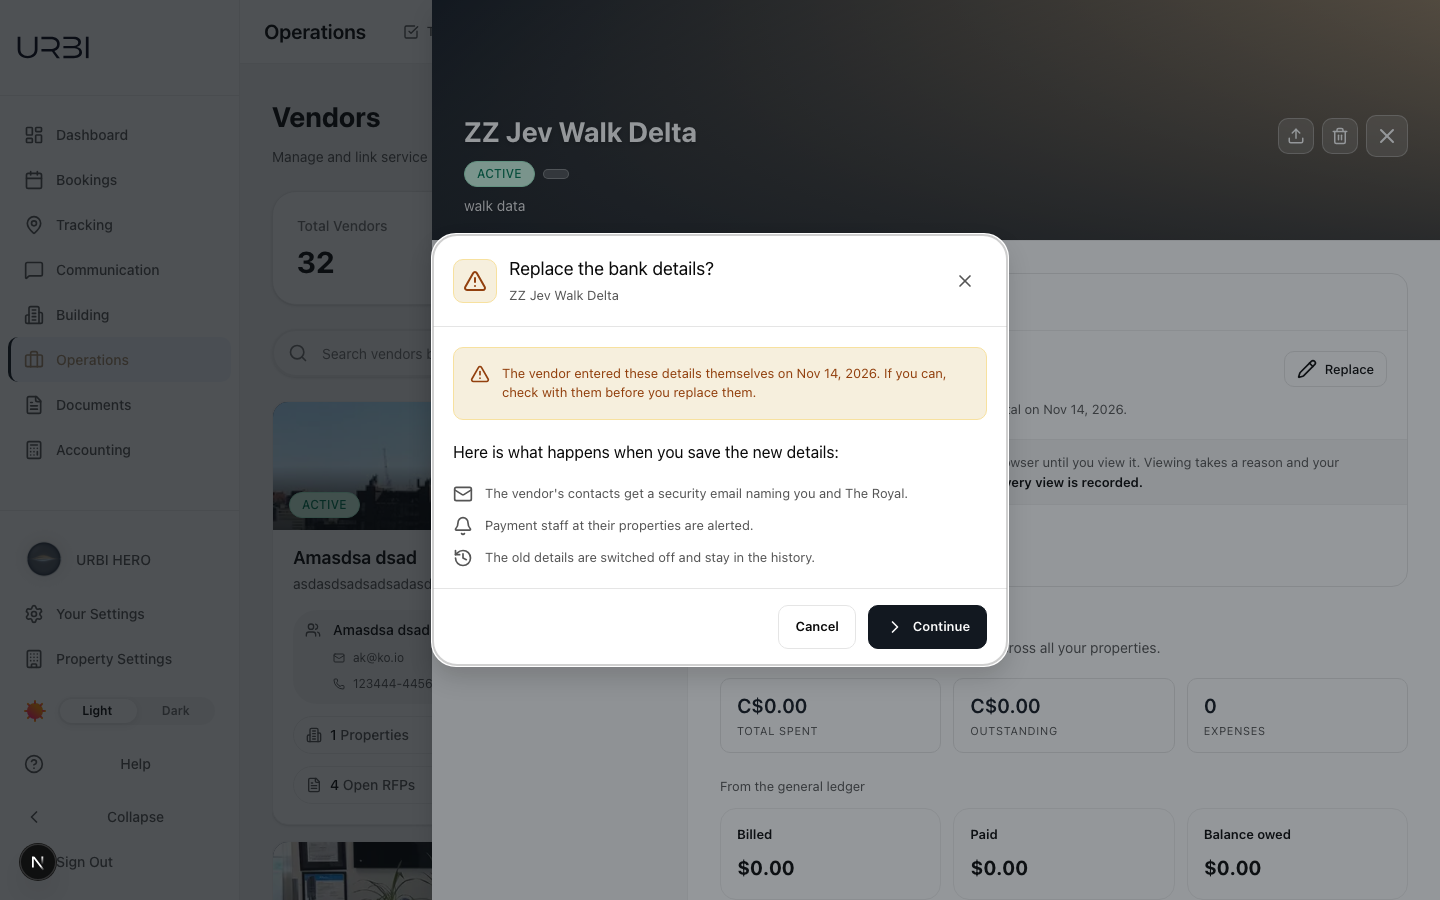
    The Replace the bank details confirmation, warning that the vendor entered these details themselves, and listing the security email, the staff alert and that the old details stay in the history

    1. Enter and confirm the new details. The current account is not shown, only its bank and last 4 digits. Attach new proof if you have it.
    2. Select Replace bank details.

    The Replace bank details form.
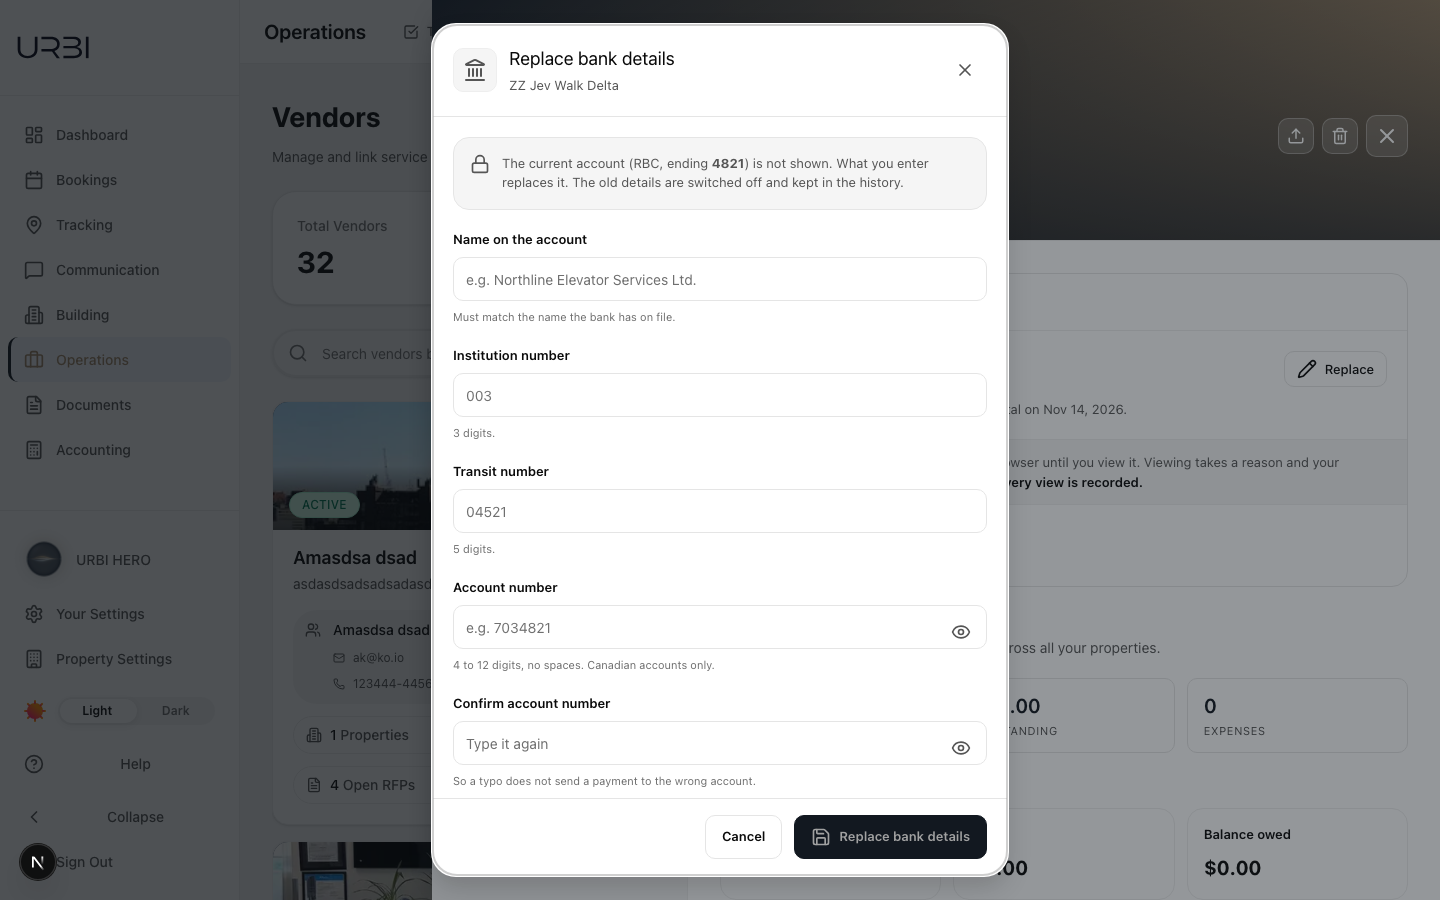
    The Replace bank details form, with a note that the current account is not shown and that the old details are switched off and kept in the history

    Replacing details switches off the old details and keeps them in the history. It does not place payments on hold.

    If someone else changed the details while you had the form open, you see These bank details changed since you opened them. Review and try again. Close the form, check the card, and start again.

    What happens after you save

    • The vendor's contacts and company email receive a Security notice: bank details changed email. It names you and the property where you made the change. It never includes bank numbers.
    • Payment staff at the properties linked to the vendor are alerted in the app and by email (you are not alerted about your own change). The alert names who made the change and never includes bank numbers. See Bank detail change alerts.
    • The Payment details card reads On file, with the bank, the last 4 digits, who entered the details and when, any proof, and the new line in Recent activity.
    • If you entered the details while paying a bill, the bill can now be sent through URBI.

    The Payment details card after a staff entry.
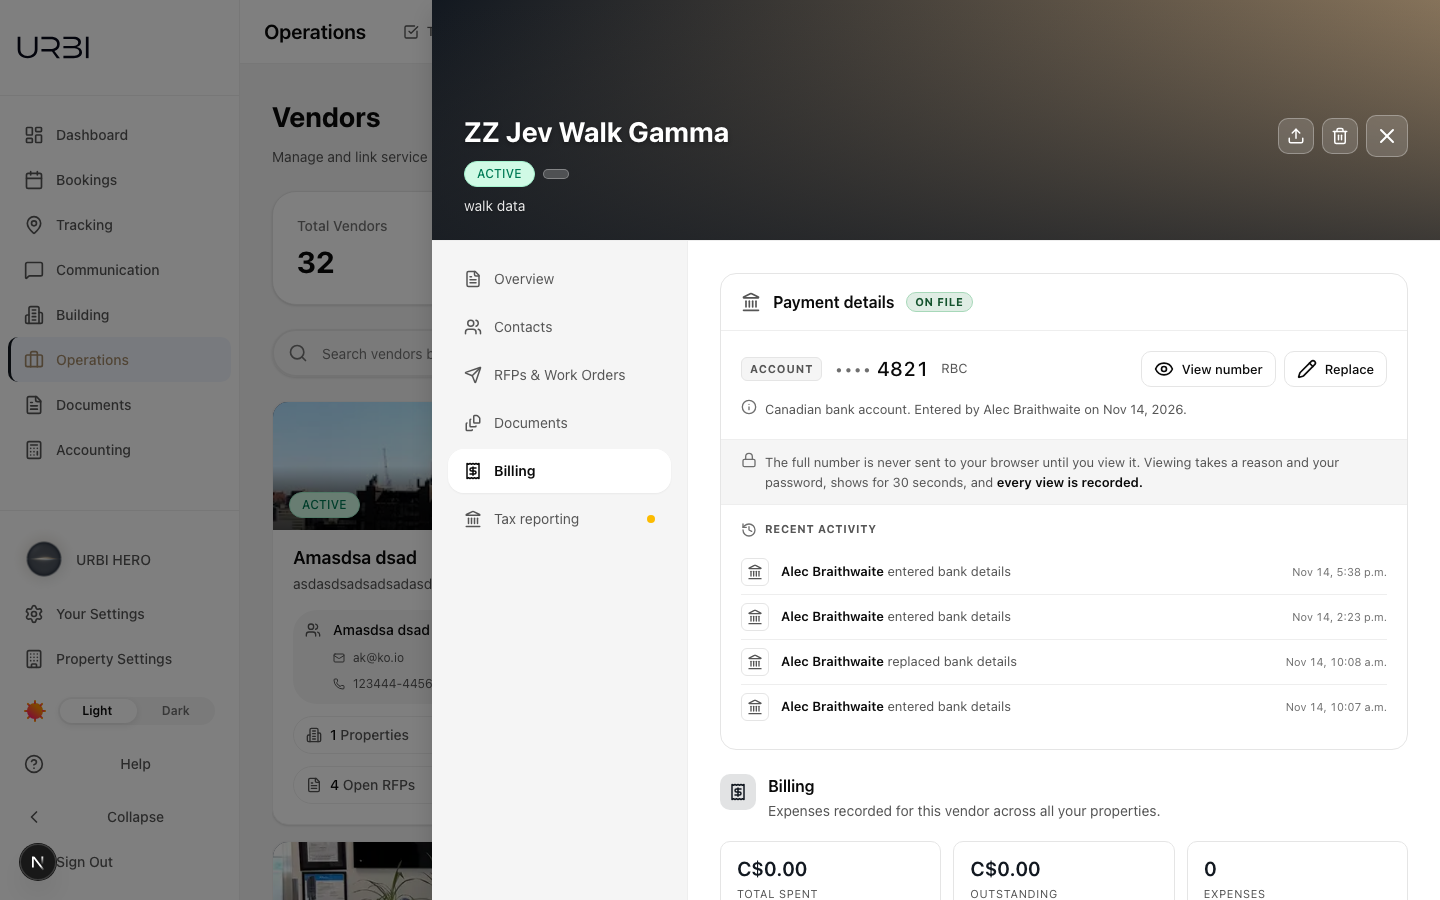
    The Payment details card marked On file, showing the last 4 digits, the bank, Entered by with the date, the View number and Replace buttons, and Recent activity

    Related: View a vendor's full bank number · Bank detail change alerts · Vendor Billing Tab overview

    Was this article helpful?

    Related articles

    Operations

    View a vendor's full bank number

    The Payment details card normally shows only the bank name and the last 4 digits. Permitted payment staff can reveal the full number when they need it, for example to check where a bill will be sent....

    Read
    Operations

    Bank detail change alerts

    Bank details decide where a vendor is paid, so URBI announces every change. The messages say who changed what and when, and never include any bank numbers. When alerts are sent Payment staff are...

    Read
    Operations

    How to view and add a vendor's expenses

    View a vendor's expenses Go to the Vendors page and click the vendor you want. In the vendor drawer, click the Billing tab on the left. Review the Total spent / Outstanding / Expenses tiles for a...

    Read
    Operations

    Vendor Billing Tab overview

    The Billing tab lives inside a vendor's profile and gives you that vendor's expense picture in one place, so you do not need to switch over to the Accounting → Expenses screen and filter by vendor....

    Read
    All Operations articlesAsk the URBI team
    URBI

    URBI is the Building OS, founded in Calgary in 2023. One platform with HERO AI built in, running thousands of units for property managers, condo boards and owners.

    Solutions

    • All Solutions
    • For Property Managers
    • For Building Operators
    • For Owners
    • For Finance Teams
    • For Businesses

    Building Benefits

    • Residential Buildings
    • Commercial Buildings
    • Education Buildings
    • Senior Living

    Products

    • All Products
    • URBI Kore
    • URBI Konnect
    • URBI AI
    • URBI Accounting (Beta)

    Company

    • About URBI
    • About Us
    • Milestones
    • Reviews
    • FAQ
    • CareersWe're Hiring
    • Contact

    Resources

    • All Resources
    • Help Center
    • Blog
    • Releases
    • System Status
    • FAQ
    • For AI assistants

    Compare

    • Compare Us to Residential
    • Compare Us to Commercial
    • Compare Us to K-12

    Legal

    • Security & Privacy
    • Terms & Conditions
    • Terms of Service for Konnect

    © 2026 URBI. All rights reserved.

    Privacy PolicyTerms of Service

    Schedule a Demo